
By Sue Hughes, Gresham Japanese Garden Pruner
My assignment from Jim Card was to prune this Picea pungens glauca, blue spruce into pads. I’ve been reading a lot about the right and wrong way to prune a conifer into pads, but I wasn’t sure how I was going to tackle this tree. I knew from reading that a pad was a cluster of healthy branches with evenly distributed foliage along its entire length. The opposite is lion-tailing, an effect that results from removing an excessive amount of inner laterals and branchlets, from a larger limb.
First, let me say, when you know you’re going to prune a stiff and pokey conifer like this Picea pungens glauca, ‘Montgomery’, make sure to wear clothes that won’t snag, and a hat that’s not a made of knit. Another key is long sleeves. So many times, I’ll walk over to one of my conifers to “just prune a little bit”, and by the end of the day my forearms are scratched everywhere there was skin showing.
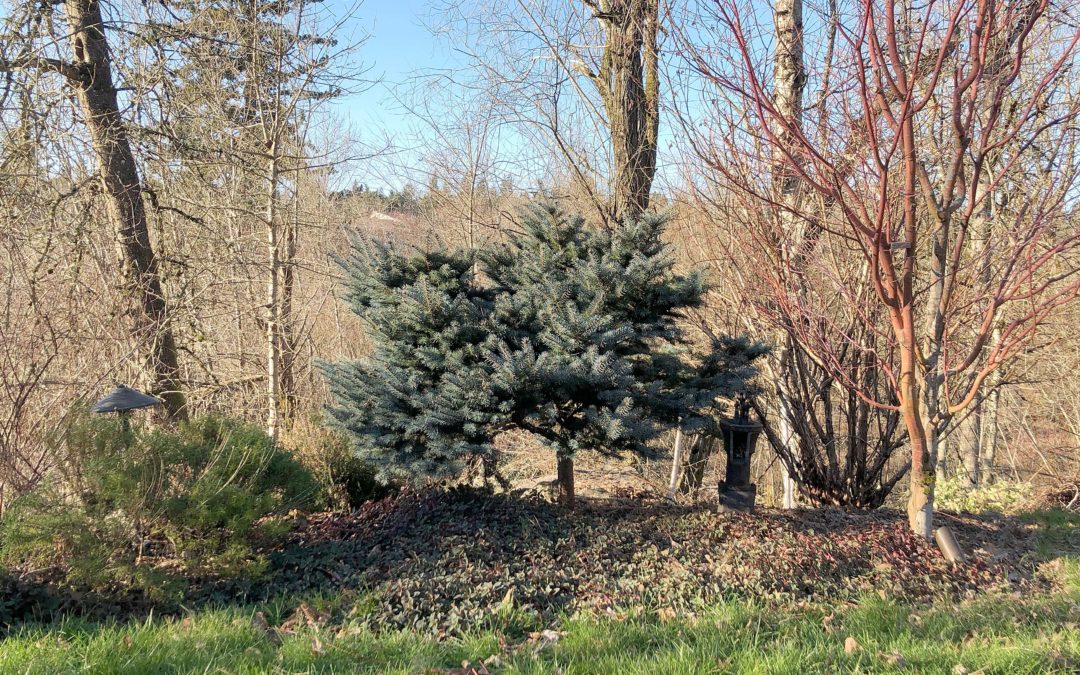
Now back to the shaping of this tree. First I chose what’s the front. It’s when I walk in the backyard around a curve in our path, I look out across the lawn and this grouping of plants is what a person sees (above image). The backdrop is a green space, so the bed always feels spacious. In front of the blue spruce sits a Acer palmatum ‘Sango-kaku’, Coral Bark Japanese Maple. I plan on keeping this maple this size. The shrub that I worry about is the Ninebark to the right of this shrub. It can overpower a yard if you don’t maintain it. I planted a Physocarpus Panther® Purple Ninebark for its puple leaf color and height. It anchors the end of this bed.
Looking at the shape and size of the other plants, I identified above, in the landscape surrounding this confier, I determined I wanted to reduce its size by about 20%. The shrub was so dense, piles of leaves sat on top of the branches. I spent time brushing the leaves off, moving branches around to determine where, and why the shrub grew this way—always thinking about my “pad assignment.” I also studied the shape of the branches. As I moved branches around, I noticed the branches grew out fan like. Figuring out the architecture of the branches helped me start visualizing how I was going to create space between branches and at the same time making my pads. My goal is to promote space between branches without creating too much space.
My first major cut was taking out a main branch that shot vertically from the trunk. This cut alone opened up the center of the shrub. The next cuts were a few smaller and lower branches. I kept seeing a nice curve to the left of the trunk, and wanted that curve accentuated. Once I opened up the left side, I stepped back to observe my work. I still couldn’t see the branching, so I took out a few lower branches in the front. Voila, I was presented with some beautiful branching starting to appear.
After trimming more dead branches, I worked on cleaning up overall shape of each pad. I removed foliage shooting upright, downright, and back towards the trunk so the branches elegantly flowed outward. After an hour working on it, I wasn’t satisfied with the space between branches, but sometimes you just need to stepped away for another day.
It’s a work in process, and I was able to prune again the next day. What I liked was looking at the pictures I took for this article. It was really helpful to see that I needed to create more space on the left side of the tree to compliment the wide space on the right side. I didn’t want to remove anymore main branches, so I really worked on making sure the outer branchlets were growing correctly. I shortened some, removed others so each branch was trimmed to a fan concave shape. Not super easy to achieve with such stiff branches.
One of my big mistakes I believe was when I reduce the height, I cut the main branch leaving a bare space. I think I should of left a pad on top. I hope this isn’t a major mistake that over time I can’t fix.
I won’t prune again for another year. I think I need to time to “live with it”, and I needs to watch the new growth take shape.