What is mottainai?

What is mottainai?

Mottainai (pronounced “moh-tah-ee-nai“) is an old Japanese concept that reflects the idea that we should respect all objects and not waste them. The term is loosely translated as “what a waste.” The word expresses the feeling of regret for an object losing its original essence. One can also think of mottainai as placing value on individual objects that they own.

The Edo period in Japanese history is seen as a heavily mottainai-influenced society. For example, the Edo people did not discard broken daily items such as umbrellas. Instead, the users sold them to collectors. Since the traditional umbrellas were made by attaching oil paper to bamboo sticks, artisans carefully peeled off the paper. The bamboo skeleton was recycled and the oil paper was repurposed for other needs.

Deeply rooted in Japanese culture, even modern children are typically taught the concept and practice of mottainai throughout their childhood. It most often takes form in the way they eat food with respect and without waste. 

Japan’s waste problems and mottainai as solution

Though the mottainai concept remains prevalent, modern Japan struggles with societal waste issues. Food waste is one example. About six million tons of edible food is discarded every year in Japan. Therefore, more businesses in the food industry especially have tackled food waste with mottainai principles. 

The Japanese fashion industry is another substantial source of waste. As a result, many fashion brands have started to strive to reduce waste during the production process. There is a rise in the number of fashion businesses incorporating a mottainai ethos. 

Living with mottainai spirit

If you put mottainai spirit into your daily life, there is plenty you can do to reduce waste. It could simply be eating all the food on your plate at each meal or purchasing the groceries from the “expiring” or “day-old” sections at the supermarket. Taking care of your home, including its furniture, with respect could make it last for decades for your family to enjoy. Being mindful of our consumption habits could change our attitude towards lifestyle and, therefore, could make a big difference when shared globally. 

This article was originally published by Zenbird Madia. Check out the full article on their web magazine.

Gresham’s Ebetsu Plaza shines with a ‘Cherry Blossom Glow’

Gresham’s Ebetsu Plaza shines with a ‘Cherry Blossom Glow’

The Outlook: March 31, 2024

On a windy spring evening, a hundred community members experienced an ethereal event, listening to traditional music while illuminated blossoms fell among them like snow.

The Japanese have a word for what Gresham enjoyed: “Yozakura,” which translates to the sight of cherry blossom trees at night. For the first time, thanks to volunteers with the Friends of the Gresham Japanese Garden, the city got to enjoy that outing.

READ ENTIRE ARTICLE

You Never Know…

You Never Know…

By Sue Hughes

One form of revenue for the Gresham Japanese Garden is renting out Tsuru Island. Most of our rentals are for graduation photos, weddings, or a celebration of life. Well, this one had me. A gentleman, Andrew, rented Tsuru Island for four hours for a movie video.

With every rental, the recipient gets a volunteer to stay onsite to monitor the entrance, and for any other incidentals. For this rental, we broke it up into two shifts. I had the first shift, and decided to prune a rhododendron with a good view of the Island. When you watch the video, you can only imagine what I was thinking, or maybe not because I really didn’t know what to think.

Enjoy and thanks Andrew for the experience.

Pruning a Blue  Spruce

Pruning a Blue Spruce

By Sue Hughes, Gresham Japanese Garden Pruner

My assignment from Jim Card was to prune this Picea pungens glauca, blue spruce into pads. I’ve been reading a lot about the right and wrong way to prune a conifer into pads, but I wasn’t sure how I was going to tackle this tree. I knew from reading that a pad was a cluster of healthy branches with evenly distributed foliage along its entire length. The opposite is lion-tailing, an effect that results from removing an excessive amount of inner laterals and branchlets, from a larger limb.

First, let me say, when you know you’re going to prune a stiff and pokey conifer like this Picea pungens glauca, ‘Montgomery’, make sure to wear clothes that won’t snag, and a hat that’s not a made of knit. Another key is long sleeves. So many times, I’ll walk over to one of my conifers to “just prune a little bit”, and by the end of the day my forearms are scratched everywhere there was skin showing.

Now back to the shaping of this tree. First I chose what’s the front. It’s when I walk in the backyard around a curve in our path, I look out across the lawn and this grouping of plants is what a person sees (above image). The backdrop is a green space, so the bed always feels spacious. In front of the blue spruce sits a Acer palmatum ‘Sango-kaku’, Coral Bark Japanese Maple. I plan on keeping this maple this size. The shrub that I worry about is the Ninebark to the right of this shrub. It can overpower a yard if you don’t maintain it. I planted a Physocarpus Panther® Purple Ninebark for its puple leaf color and height. It anchors the end of this bed.

Looking at the shape and size of the other plants, I identified above, in the landscape surrounding this confier, I determined I wanted to reduce its size by about 20%. The shrub was so dense, piles of leaves sat on top of the branches. I spent time brushing the leaves off, moving branches around to determine where, and why the shrub grew this way—always thinking about my “pad assignment.” I also studied the shape of the branches. As I moved branches around, I noticed the branches grew out fan like. Figuring out the architecture of the branches helped me start visualizing how I was going to create space between branches and at the same time making my pads. My goal is to promote space between branches without creating too much space.

My first major cut was taking out a main branch that shot vertically from the trunk. This cut alone opened up the center of the shrub. The next cuts were a few smaller and lower branches. I kept seeing a nice curve to the left of the trunk, and wanted that curve accentuated. Once I opened up the left side, I stepped back to observe my work. I still couldn’t see the branching, so I took out a few lower branches in the front. Voila, I was presented with some beautiful branching starting to appear.

After trimming more dead branches, I worked on cleaning up overall shape of each pad. I removed foliage shooting upright, downright, and back towards the trunk so the branches elegantly flowed outward. After an hour working on it, I wasn’t satisfied with the space between branches, but sometimes you just need to stepped away for another day.

It’s a work in process, and I was able to prune again the next day. What I liked was looking at the pictures I took for this article. It was really helpful to see that I needed to create more space on the left side of the tree to compliment the wide space on the right side. I didn’t want to remove anymore main branches, so I really worked on making sure the outer branchlets were growing correctly. I shortened some, removed others so each branch was trimmed to a fan concave shape. Not super easy to achieve with such stiff branches.

One of my big mistakes I believe was when I reduce the height, I cut the main branch leaving a bare space. I think I should of left a pad on top. I hope this isn’t a major mistake that over time I can’t fix.

I won’t prune again for another year. I think I need to time to “live with it”, and I needs to watch the new growth take shape.

What to do with your scorched plants?

What to do with your scorched plants?

Pines

In the case of your pine shrubs, as you can see by this one that faces the southwest, it’s extremely scorched. This top layer of burnt needles is still protecting the branches underneath and they are not dead branches.

You can check for dead branches by scraping the stem. If brown, then it’s dead and go ahead and cut off. If it’s green, then wait until the fall to trim back.

Watering Plants During a Heatwave

Watering Plants During a Heatwave

Watering Your Plants During a Heatwave

Watering is tricky during a heat wave – or more specifically, getting the water into the plant. This largely depends on the ability of your soil to hold water. Clay, loamy, or sandy soils will all perform differently.

Soil must hold water to attract more water, as water molecules bind to each other. So if your soil is completely or almost dry, a large amount of water will run off before it accumulates in the roots.

You also have high evaporation rate during a heat wave, so the less that’s in the air (no sprinklers), the better. Water in the early morning, before the sun and heat ramp up. Watering in the early morning instead of the evening also allows time for foliage to dry, reduces loss to evaporation, and reduces the chance of fungal infections (but if heat stress is apparent midday, water again at night.

The best way to water plants is with a watering can

Controlling irrigation is essential during a heat wave, as large amounts of water can be lost to evaporation and runoff. The most controlled way to water, outside of drip irrigation, is with a watering can.

Pour a small amount of water around the root zone. Most of it will run off if the surface soil is dry. Wait about 10 minutes and pour a small amount of water again. Less should run off this time. Wait another 15 minutes, and then water sufficiently to make the soil wet to a depth the length of your index finger. This actually isn’t as hard as it sounds, because by the time you get to the last plant, it will be time to start again with the 1st plant.

If you have a large garden, this, of course, would be an all-day task. You can adapt this method to watering with a hose, but concentrate on the root zones, not overhead watering.

With container plants, heat shrinks the potting soil and leaves a gap between the hot container wall and the roots. The most efficient way to water plants in containers during a heat wave is from the bottom-up. Sit the container in something like a big plastic bin. Pour water into the bin and watch as the plant roots make the water slowly disappear. Also put your container plants in the shade.

And never ever, ever fertilize plants during a heat wave. First, a lack of nutrients isn’t the problem. Second, the plants can’t take it up, so the fertilizer either runs off or collects in the soil, which may burn the plant when it resumes its normal functions.


A Lesson on Pine Trees

A Lesson on Pine Trees

A Lesson on Pines

As a pine tree ages, interior and low branches die off from lack of light and energy. To keep a pine tree healthy, spring candling, winter needling, and cutting out branches to retain its shape are necessary.

Before pruning, you first study the natural shape of the tree. This may conflict with your desired shape. Strive to bring out the best potential for its natural beauty according to its natural shape. (See Figure 1)

Start in the winter by removing needles. Removing needles can reveal the graceful limbs and trunk of the tree, allow light and air to penetrate the center of the tree and lower branches, and help reveal its natural shape. (You can do this now too, but winter is the best time of year.)

After you’ve determined its shape, (and your desired shape), the way to achieve this is by pruning or “candling”. Candles are new growth on a pine. They develop from fall through winter until spring. To learn how to candle refer to Figure 2 and watch the How-To video. Candling is done in May and early June.

PURPOSE OF CANDLING
1. Control the length the branches
2. Make a greater number of branches
3. Make branches more dense

Through proper pruning, you can direct the energy flow and achieve your goal for shape, density, and form. You can direct where new development is likely to take place and create optimum opportunities for future growth.

pine tree shapes

Figure 1: Natural shape of pine trees

candling pines

Figure 2: Direction of growth
that occurs from your cuts

Sakura in Japanese Culture

Sakura in Japanese Culture

Sakura in Japanese Culture

By Mary Dickson

They blossom, and then
We gaze, and then the blooms
Scatter, and then…
(Onitsura, poet)

Beyond the beauty of sakura, the national flower of Japan, lies deep symbolism for the nation and its people.
One of my Japanese friends said, about the importance of the annual blooming of cherry trees, “the shortness of life means a lot in Japan. Everything is constantly changing is a major tenet of Buddhism. If you walk under the cherry trees with blossoms, you see the petals falling down one after another. I can’t explain the feeling very well, but every time I walk under the cherry trees, I feel strongly that I need to memorize the beautiful scenery into my eyes…it only comes once a year, and I may be a little different next year because I hope I grow as a human every year.”

For many centuries in Japanese culture, sakura has symbolized beauty and mortality. Samurai warriors personified this metaphor. Bushido, (the way of the warrior), is the strict moral code of respect, honor and discipline by which samurai lived and died.

While the short life of the sakura may represent death, the blooms of spring also bring renewal, and sakura also symbolizes rebirth, the cycle of life. For over 1,000 years, the ritual of hanami has been celebrated with picnics under the gorgeous pink blossoms. Nighttime viewing, called yozakura, is popular, especially among couples looking for a romantic atmosphere.

Since sakura blooms signal beginnings, school terms start in April in Japan. The Cherry Blossom Festival in Washington, DC, takes place around the Tidal Basin. Thousands of cherry trees, sent from Japan at the beginning of the twentieth century, enthrall visitors.

Enjoy the cherry trees in the Gresham Japanese Garden, the Portland Japanese Garden, and along the Willamette River in Portland to find hope and renewal this spring.

Under cherry-flowers,
None are utter strangers.
Koyayashi Issa, poet 1763-1828

What’s wrong with this tree?

What’s wrong with this tree?

When you walk through Main City Park past Tsuru Island towards the entrance to Springwater Trail, is where Gresham Japanese Garden’s Resource Center is located. Now that you’re oriented, in front of the Resource sits this tree. It’s a 25-year old Shishigashira Japanese Maple. Its a beautiful tree—if only it didn’t have sun scald!

What is sun scald?

Sun scald is a freezing condition most frequently caused by reflected light off the snow during winter months. The damage in this case will appear as sunken or dead bark on the trunk of the tree, then later in the tree’s life the bark might fall away revealing dead tissue in the tree’s cambium layer. This damage will typically be found on the south west facing side of the tree’s trunk. It can be found on other sides of the tree if there is light reflection from other sources, like man-made structures or reflective rock faces. After a tree is afflicted by sun scald it becomes much more vulnerable to decay organisms. The plant will create walls around the affected area, but sometimes it is not enough to block the infections. The leaves of the tree are also affected by sun scald, particularly on a bright sunny day following a period of warm cloudy humidity. The damage to the leaves will start as bronzing of the epidermis between the veins of the leaf, and if the sunny conditions persist the tissue of the leaf will die.

What do we do now?

In the case of our Shishigashira Japanese Maple, we placed the sun scald side of the tree towards the west sun to promote growth because the sun scald damaged the branches causing the tree to be lopsided. After two years of deliberate, aesthetic pruning the tree shows very little sign of sprouting new branches on the weak damaged side. So, what do we do now with our Shishigashira Japanese Maple? We rotate to the good side!

The good side

Every tree, shrub landscape has a good side. The good side is referred to as the angle the the said material is most viewed. We will rotate the tree potted in the large clay pot so everyone can enjoy the true beauty of this tree.

Local Roots

If you didn’t know, Don Schmidt Nursery in Boring, Oregon specializes in growing maple trees! Our Shishigashira Japanese Maple originated from a with a Gresham-Ebetsu Sister City Association member, who propagated it from cuttings, gifted to a relative in Portland, and then donated to the Gresham Japanese Garden when the owners downsized. Such history in trees!

Resources:

Utah State University Forestry Ext.


Developing Ambleside Annex

Developing Ambleside Annex

The History of Ambleside

The name Ambleside comes from the Ambleside Summer Homes built in the 1900s off of Johnson Creek by the brick plant on Hogan. The name Ambleside was borrowed from a village in England’s Lake District, which attracted artists, poets, and others to enjoy the area’s natural beauty. Ambleside was unique in Oregon as a summer residential garden enclave.

It served as a retreat for prominent city leaders from Portland as summer cottages. They would take the train from Portland to Gresham. There was an Ambleside train stop, along with a Gresham Station train stop.

There were 10 homes total over the course of 100 years. Some were sold, some became dilapitated, paved streets were added — development happened. Johnson Creek frequently flooded and eventually these homes were either sold to Metro, or torn down.

Read the entire history here: https://www.oregonencyclopedia.org/articles/ambleside_summer_homes_tract/#.Y0InKcHMLCU.

In 2018 Metro took action and bought all the Ambleside property, stripped all the pavement and turned it all back into flood plains.

A gentleman from Metro called Jim in June of 2018 and offered to the Garden the mature plant material. June was NOT the right time to be uprooting any plants! December would of been a much better month, but Jim said he’d come take a look.

Jim assessed the plants and determined he could save eight plants. Him and Jim Buck  pruned, sprayed with wax, and prepared them for transporting over the course of two days for the City to haul to the Garden. Some of the root balls were 5ft in diameter!

At the time, Jim had no idea where he was going to put them, but he knew he didn’t want them to be bulldozed. He first looked at Phase 1 of Ebetsu Plaza but realized that wasn’t going to work, so he looked at the west side of the Plaza and decided that was a good area. They built the planters, mounded the dirt and planted the trees and shrubs. They only lost one plant in the move.

During the planting process, the name Ambleside Annex stuck in Jim’s mind, and that’s how the name was formed.

There is one last piece to the story. When Metro came in to bulldoze, one house still stood. It was a Queen Anne style house. Jim was given the opportunity to remove any of the wood work he saw in the house. He grabbed the six pillars (soldiers) that you now see in the Annex.

Organic Vegetable Gardening: A Beginner’s Guide

Organic Vegetable Gardening: A Beginner’s Guide

There’s something quaint about gardening. And it isn’t just touching the earth; it’s the intimacy of tending to plant life. More and more people are gravitating towards starting their own gardens not just for hobby’s sake, but also for sustainability. Home gardening continues to rise in popularity as people cope and are forced to stay-at-home. If you’re contemplating starting your own vegetable garden, we have an even better idea for you. We’ll teach you how to start an organic vegetable garden with some simple beginner tips.

Organic Vegetable Gardening Beginner’s Tips

Organic vegetable gardens take sustainability up a notch by focusing on all-natural, organic, sustainable means of gardening. Here are some tips to note to jumpstart your organic garden.

  • Choose a place that gets 8 hours of sun a day.

Most fast-growing vegetables need full sun access for 8 hours a day. When choosing the plot for your organic vegetable garden, make sure the location allows at least 6 to 8 hours of sun a day.

  • Choose a small plot of land.

If you have a lot of room to spare, you may be tempted to start with a large plot, but 100 square feet is already enough. The reason for this is to make sure your crops don’t get overrun by weeds.

  • Make sure you start with good and healthy soil.

Good soil can be made by adding a few inches of quality compost on the top while keeping it moist. Soil is the foundation of gardening, which should be prioritized in gardening.

  • Buy plants as a beginner and sow seeds as you progress.

It’s easier to start with plants as a beginner instead of sowing seeds. Certain plants are available at $1 to $3.

  • Use liquid fertilizers to start your organic vegetable garden.

Fertilized soil takes time, and using liquid fertilizer is faster and beneficial at the same time. Some gardeners recommend ocean water and seaweed fertilizer as natural liquid fertilizers.

  • Water seeded areas daily.

A newly seeded vegetable garden has to be watered regularly. It may be challenging to keep up with watering habits, but it is crucial to your garden’s survival.

Want more gardening tips and hacks? Our friends from Garden Simply would be happy to help. Go to  www.gardensimply.com

The Benefits Of An Organic Garden

Going organic even in gardening provides many benefits for the garden, the gardener, and the environment. All it takes is a conscious choice to choose sustainability over an easy and fast process.

  • Organic fruits and vegetables are more delicious.

Fruits and vegetables harvested from an organic garden don’t look as appealing and uniform as supermarket produce but they are arguably better.

  • Organic fruits and vegetables are healthier.

The use of chemicals compromises the quality of fruits and vegetables. They may appear bigger, but they don’t have the same high content of vitamins and minerals as organic produce.

  • Growing an organic garden helps save money.

Organic produce bought in a farmer’s market or specialty food stores costs higher than those bought at the supermarket. Growing your organic garden is more affordable and accessible.

  • Organic gardening preserves the environment.

Organic gardening affects communities on a large scale by relieving landfills and preventing animals and birds from consuming toxins from chemicals.

Conclusion

An organic vegetable garden is beneficial and fulfilling. The pursuit for sustainability starts with us, through our choices, and in our homes. And now that gardening is becoming more popular, we should decide to do it the right way.

Pollinators: Nature’s Gardeners

Pollinators: Nature’s Gardeners

As children, we’ve been fascinated by birds, bees, and flowers, knowing little about their interrelation in nature. But as we mature, our fascination evolves into deep admiration and respect for the complex yet beautiful part they take in pollination. Whether it’s the honest surprise of seeing a lone butterfly in the garden or intentionally attracting birds, pollinators are nature’s intuitive gardeners, and we are bystanders as they work wonders among other plant life.

Who Are The Pollinators

Nature has its own intuitive way of maintaining the ecological process of pollination through its agents. And although animals, humans, and even wind can be pollinators, insects and birds perform a bulk of pollination.

Hummingbirds And Their Wings

Hummingbirds seek sweet nectar while rapidly beating their wings. This pollen ends up on their feathers, which they inadvertently take with them to another plant. With their wings still beating rapidly, they shake the pollen loose, which floats to other plants nearby, aiding the pollination process.

Bees

  • Solitary bees – This species of bees is well known, stingless, and are not aggressive. They possess the anatomical structures essential to pollination, like hairs that collect and transfer pollen.
  • Bumblebees – These bees use buzz pollination, which involves grasping a flower and vibrating wing muscles to loosen pollen. Wildflowers and crops like peppers and tomatoes benefit from this type of pollination. They are essential pollinators that need to be protected.

Butterflies And Moths

Butterflies and moths are useful and valuable pollinators. As they flit from one flower to another to drink nectar, they take pollen with them and bring it to other plants.

Wasps

Although wasps are known for their aggressive behavior, they offer valuable service in balancing insect populations. They do not have the anatomical structure of bees to trap pollen with their hairs since they’re smooth-bodied, but they provide incidental pollination as they carry and drop pollen from flower to flower.

Beetles and Flies

Beetles and flies are said to be the insect pollinators of the late Jurassic era. Like wasps, they have smoother bodies making them minor but still important pollinators. There are some species of flies that are beneficial to pollination.

How To Attract Pollinators To Your Garden

Understanding the role of insects and birds in the ecological process makes us think twice about swatting a wasp. In the grander scheme of things, we need pollinators, and they need us. Here are some tips to attract nature’s gardeners to your space and encourage pollination.

  • Grow a wide selection of flowers that bloom all year long.

Different insects are attracted to different flower types. It’s fascinating how in the natural world, even compatibility is required.

  • Attract pollinators by growing a variety of colors.

Bees are attracted to yellow, blue, and purple, while butterflies are drawn to flat flowers that grow in clusters. Hummingbirds favor funnel-shaped flowers in orange, red, or pink.

  • Grow fragrant and aromatic flowers.

Pollinators love aromatic flowers, making herbs like sage, basil, and lavender attractive options.

  • Create a space where they can rest and nest.

Whether it’s providing a birdbath or large screening shrubs, attracting pollinators also means you have to create a safe ecological space for them. It’s like being landlords to your working tenants. 

Conclusion

Pollinators are essential to our ecosystem. 75 to 95 percent of flowering plants need help with pollination, and the intuitive nature of pollinators makes this possible. They are integral to our survival and help maintain balance in the world. This significant impact comes from small creatures. It’s fascinating, but most of all, it’s humbling.

Want more gardening tips and hacks? Our friends from Garden Simply would be happy to help. Go to  www.gardensimply.com.

Locally, please check out our Pollinators class January 12, 2021.

Dancing Cranes Join Ebetsu Plaza

Dancing Cranes Join Ebetsu Plaza

Dancing Cranes Sculpture

This story is narrated by Jim Card.

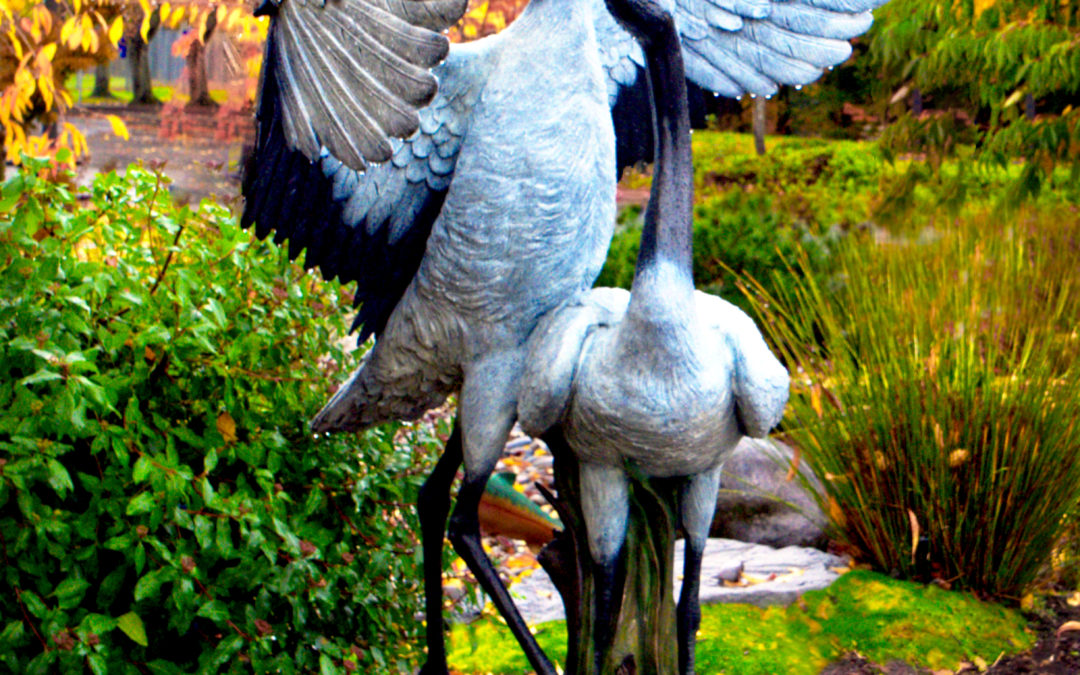
Jim had come across a picture on Pinterest showing a picture of dancing cranes in a flock. One day he was talking to Bill Peterson, our resident photographer, and showed him the photo and a video and they were both entralled with the beauty of the cranes.

A little time had past, and they were both standing in the Resource Center. Bill with his keen eye looking out the window towards Ebetsu Plaza pulls Jim over to the window, points to where the cranes sit today and says “wouldn’t that be the perfect spot to put the cranes.”

This leads to Alyson Huntting. Jim mentions to Alyson about the Bill and his conversation. A little while later, Alyson approaches Jim and tell hims she would like to commission Rip Caswell to create the cranes. From that point on, Alyson and Jim met with Rip and Alison Caswell nine times over nine months in 2019.

The Caswell’s had a similar version of herons that gave them the inspiration to create dancing cranes. The first process was a sketch. This transformed into a table-top version. Then a mold. At one of the visit, Rip formed some of the rocks at the bottom. Eventually the piece went to the foundry and Rip took Jim and Alyson to the Foundry too. During this time, the Caswell’s also had a major fire in the foundry setting the project back a few months.

During one of their visits, Alyson took notice of the fish in the Foundry and asked Rip to create two as well.

There were discussion about anchoring the fish. In the discussion of mounting the cranes Jim and Alyson went to Smith Rock quarry and picked the flat rock that the crane is now mounted on.

Before the crane was installed at Ebetsu Plaza, Alyson and Jim met with the City and City Manager to ensure that the cranes will never leave Ebetsu Plaza.

This sculpture was delayed for over nine months and was a secret until we could give the cranes a proper unveiling. Due to COVID, we ended up unveiling October 31, 2020 with Friends of Gresham Japanese Garden in attendance.


There are Better Ways to Prune Your Bushes

There are Better Ways to Prune Your Bushes

Spring is a good time to prune most of the trees, shrubs, and evergreens in your yard. Unfortunately for many homeowners AND landscapers this means getting out the power shears and whacking back the bushes into balls and boxes. While the resulting “Green Meatballs” might be the norm in American landscaping, it’s not the ideal way to prune woody plants.

Besides being boringly overdone, all of that tight trimming encourages dense growth that shuts off light to all but the outer leaves and slows the drying of leaves in humid or rainy weather, which translates into more incidence of disease.

Healthier and far more interesting pruning techniques are possible. Some of them can turn a plain green bush into a work of art, and most of them take just a little know-how and willingness to try something different.

There are much better ways to prune the landscape: pollarding, coppicing, topiary, Espalier, thinning.

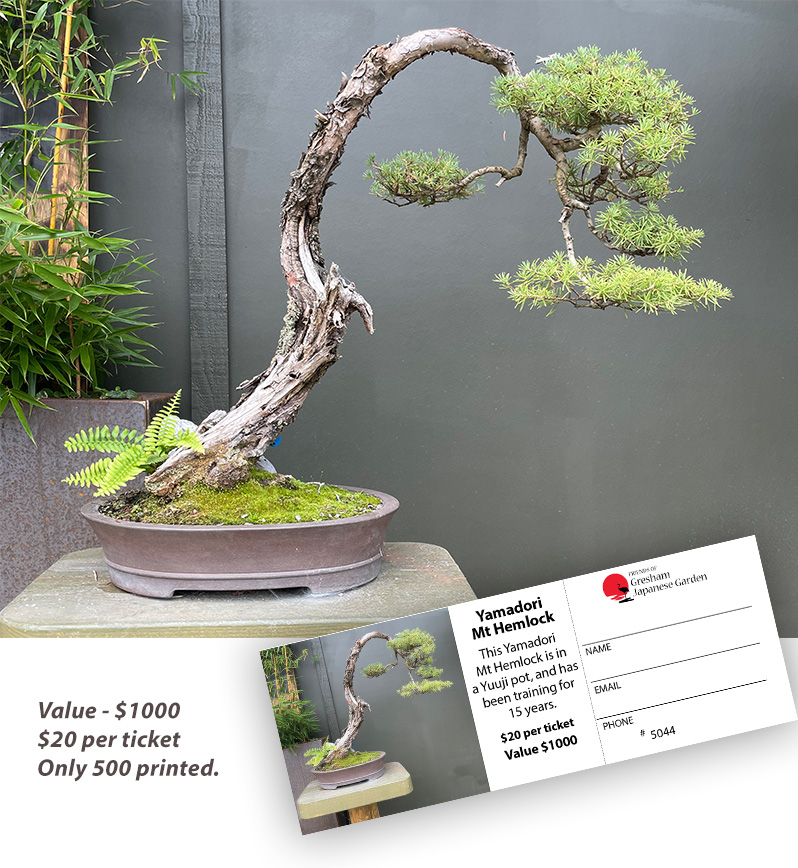
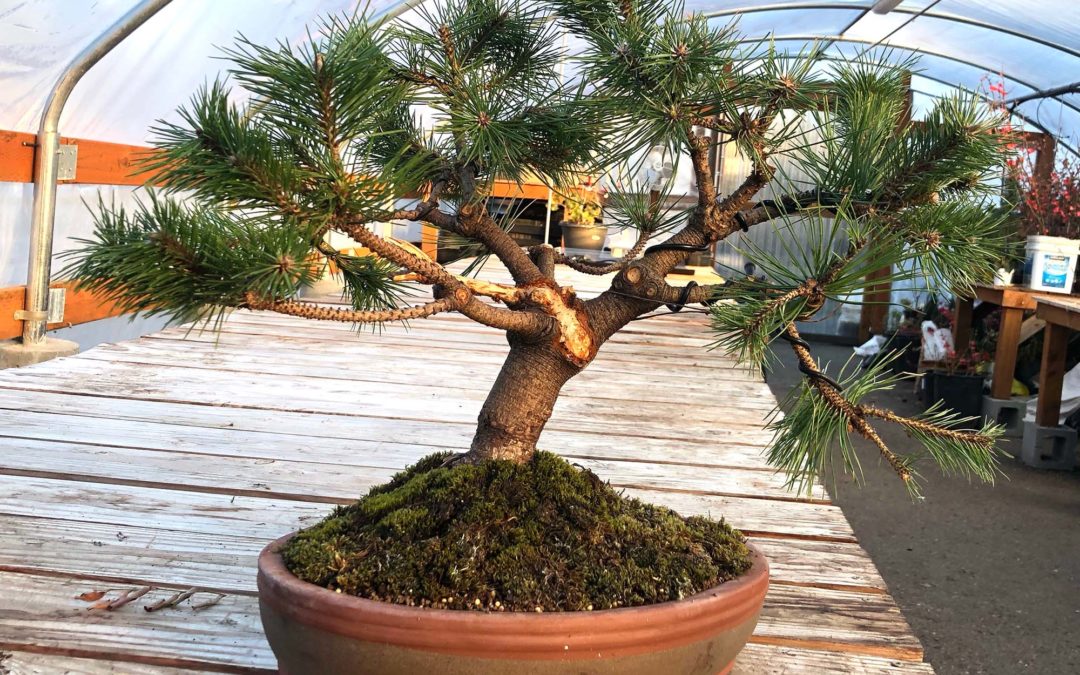
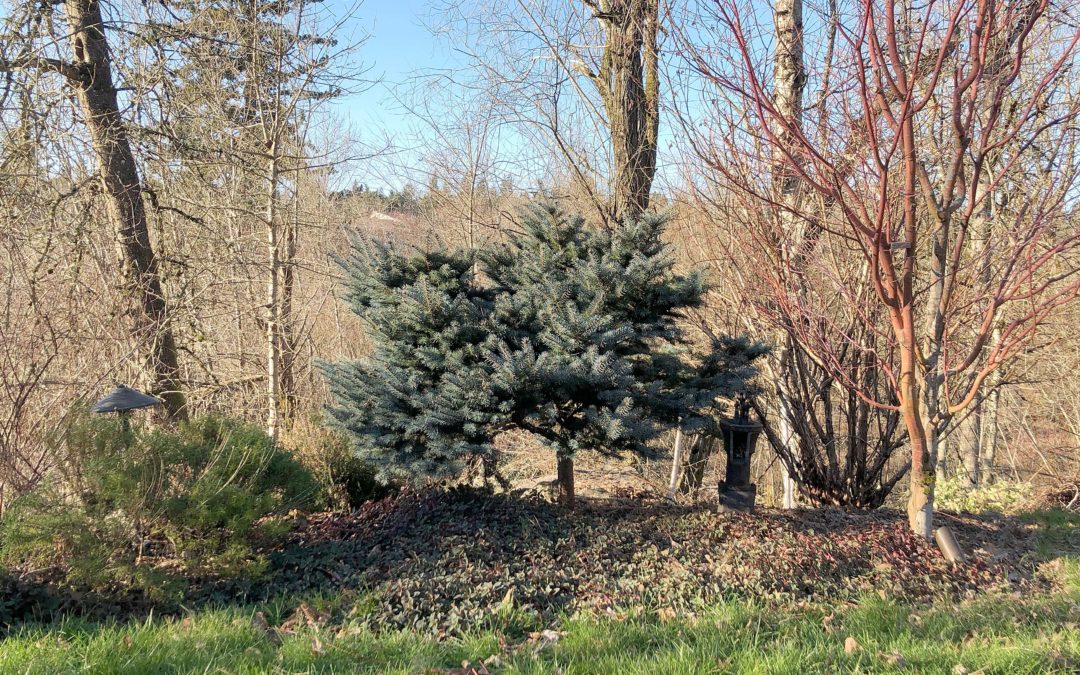
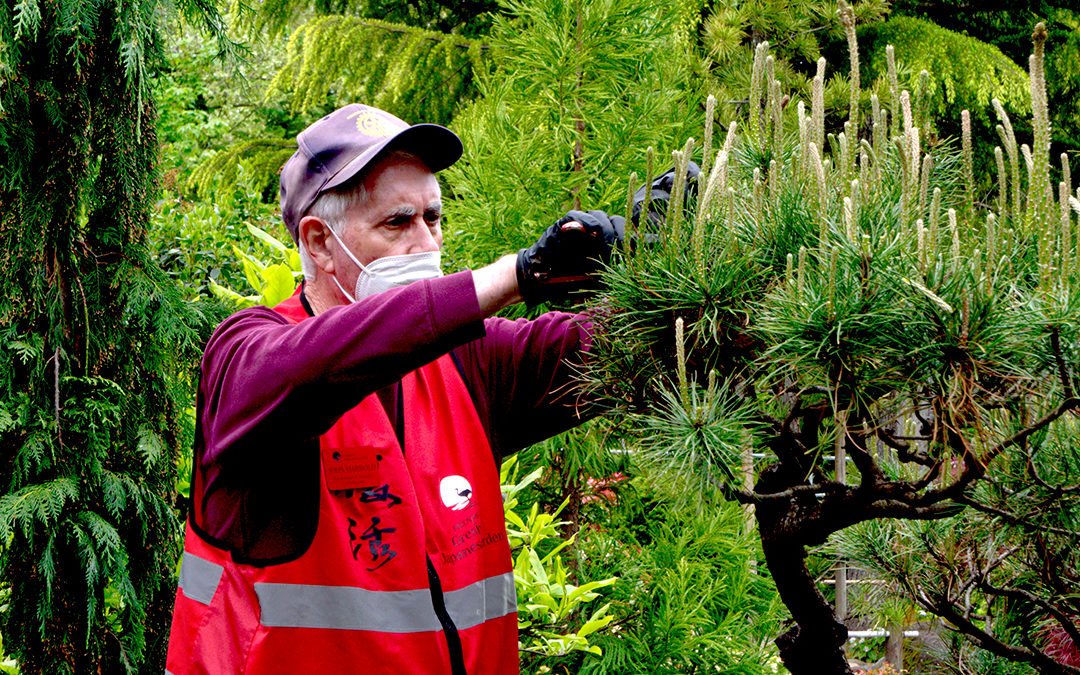
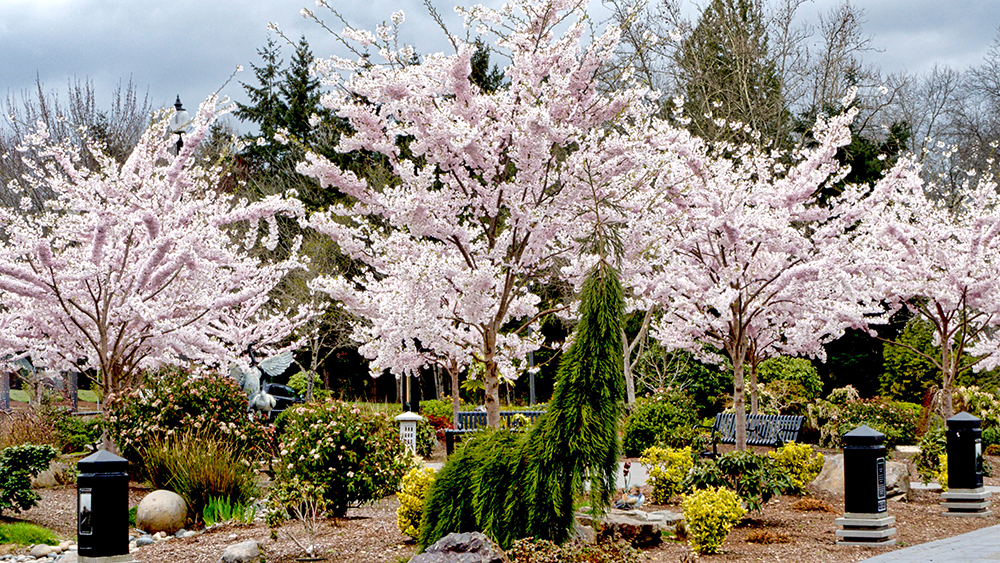
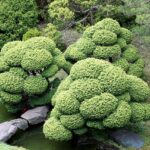
In Japanese landscaping you will find plant art called niwaki. Niwaki is trimming, pruning, and branch-training to create a series of rounded forms that resemble clouds. You can prune densely to create a shrub that looks to have a cluster of clouds or more open to create something that looks like green puffballs on the end of branch arms. Dense evergreens take to this technique best, i.e. boxwood, yew, privet, Japanese holly, and pine.

Another Japapese art is Garden bonsai. Most people are familiar with the Oriental plant art of bonsai in which the artist miniaturizes a tree by growing it in a shallow pot and meticulously pruning the branches and roots. Something similar can be done with in-ground plants, except you won’t be digging up the plants to prune the roots.

The idea is to try and create a unique shape, ideally by pruning to encourage the shape and direction the tree wants to take. You might end up with something that looks wind-blown or that resembles the skeleton of an animal. One of the tricks is pruning just above a bud that’s heading in the direction where you’d like the branch to go. Small deciduous trees are some of the best, such as Japanese maple, dogwood, and seven-son flower, but most evergreens are fine, too, especially pine and juniper.